Paul Lee - SQ2000 Project,
Pierre SD USA
Click on images for larger view.
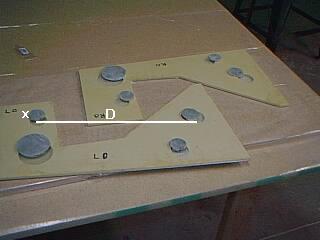
NG Side Plates Warning:
(01-25-02 update - too late for me) The position of the front top (cylinder
pivot at "x") reinforcement hole may be incorrect. As per plans drawing NG-A that
I had, the side templates were designed for an OilDyne cylinder which is
no longer made and was replaced by a Clippard cylinder whose body is 1
inch too long and could not fit into position properly. It might be a
good idea to flox in a larger crush plate hole area for the cylinder
bolt position - more forward as well - and not to flox in the aluminum
crush plates until after installation and you actually get the
cylinder and see what position it needs and then drill the bolt hole.
Apparently some other builders had discovered the problem too. I do
not know if the factory has changed the specs now. Trying to solve
this, I have ordered a 1 inch shorter Clippard cylinder ($27, Clippard
part number 7D-5) that seems to have sufficient travel and will fit
into the current layout (fingers crossed) - NOTE REVISION AND PROBLEM
WITH Clippard cylinder on the NoseGear construction page.
For other cylinders the position of cylinder pivot at x should be moved left or right so
that distance D is equal or greater than 6 inches plus cylinder
length L (from pivot hole to end of end of cylinder body). You really should
have the cylinder before making the side plates. 5" stroke is probably the
minimum required.

10-06-01 to 10-07-01:
Glassing front firewall surface with 6 bracket screws inserted toward rear:

Bulkhead turned over and weighed/clamped to flatten surface. The BOSS supervising in background.:

10-07-01 to 10-09-01 +
Lost 3 days installing new insulated garage door. Instructions were for several models
of garage doors - very confusing. Hard to get installers for jobs here - 1 week wait.
10-10-01 to 10-11-01
Making nose gear (NG) side plates. Cutting out foam reinforcement holes.
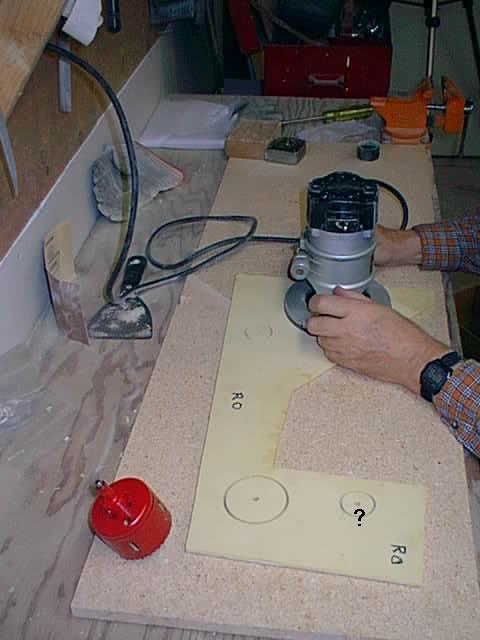
Note: NG bolts through plates require solid fibreglass reinforcement - removing
the high density foam center core and filling with fibreglass - one little circle
layer of glass and epoxy at a time. After cutting out a circle just above lower glass
layer with a circular saw, I removed the rest of the foam with a router (works great).
I was supposed to cut and epoxy little fibre discs to fill up holes but decided to
try make a bunch of layers of glass equal in thickness to the holes and then just
jigsaw the circles and epoxy them into the holes later.
Return to main page