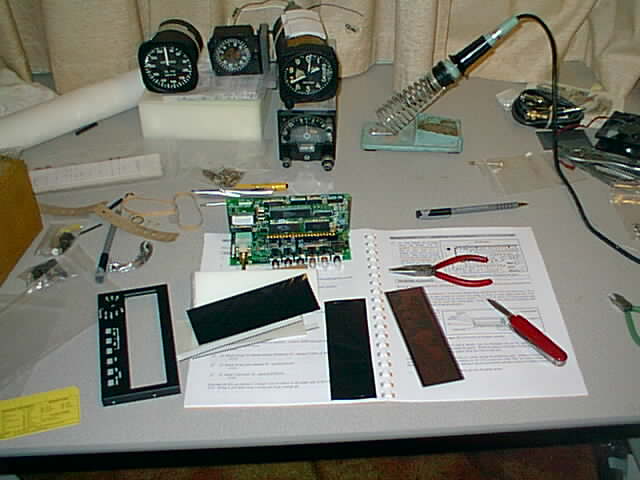
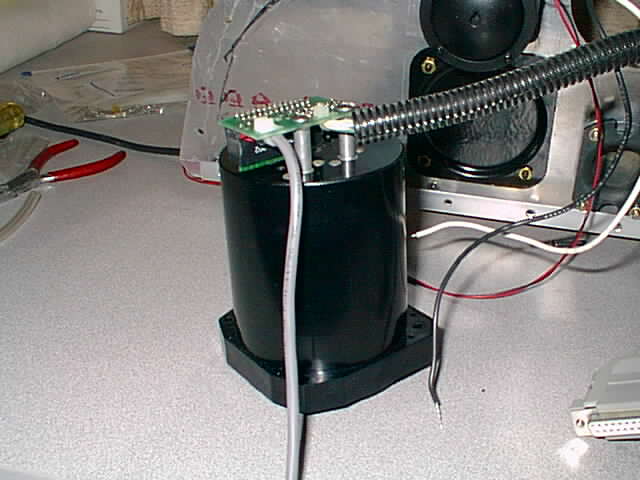
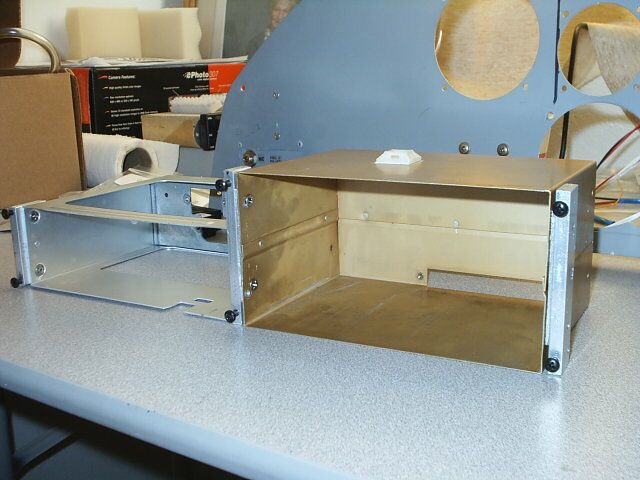
 Putting together the RMI digital engine monitor. Other avionics collected is also shown.
Most of the older style avionics will be for redundancy. An EFIS primary flight control (to be
gotten yet) and the digital monitor be the main avionics.
Putting together the RMI digital engine monitor. Other avionics collected is also shown.
Most of the older style avionics will be for redundancy. An EFIS primary flight control (to be
gotten yet) and the digital monitor be the main avionics.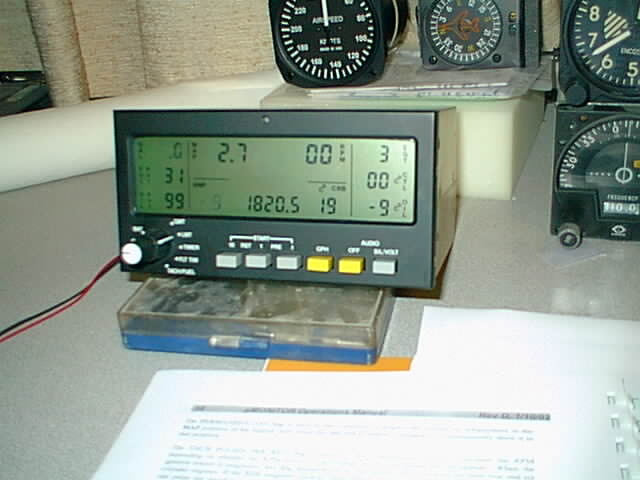 And after 48hour burn in digital engine monitor is shown with display on - sensors not hooked up yet.
This will save a lot of panel space without old style engine gauges crowding the panel.
And after 48hour burn in digital engine monitor is shown with display on - sensors not hooked up yet.
This will save a lot of panel space without old style engine gauges crowding the panel.
 2012/04/05 Postbuild note: In 2010 I switched over to MGL Avionics xTreme
EFIS that includes EMS. The EMS part has an engine box with all the engine
control wires going to it and just a few wires going from it back to the panel EFIS/EMS.
That saved a ton of wires.
2012/04/05 Postbuild note: In 2010 I switched over to MGL Avionics xTreme
EFIS that includes EMS. The EMS part has an engine box with all the engine
control wires going to it and just a few wires going from it back to the panel EFIS/EMS.
That saved a ton of wires.
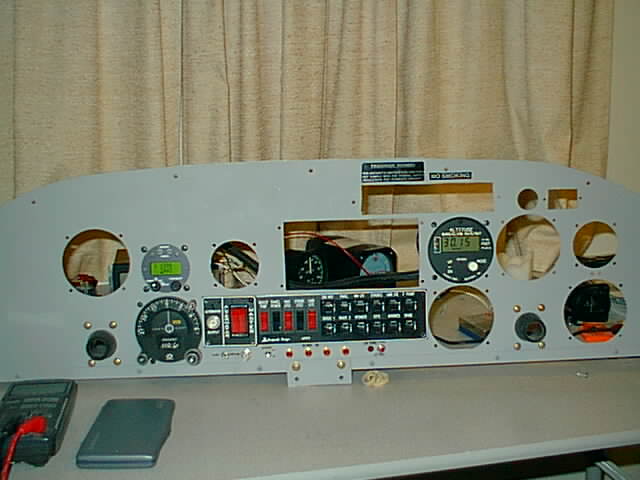
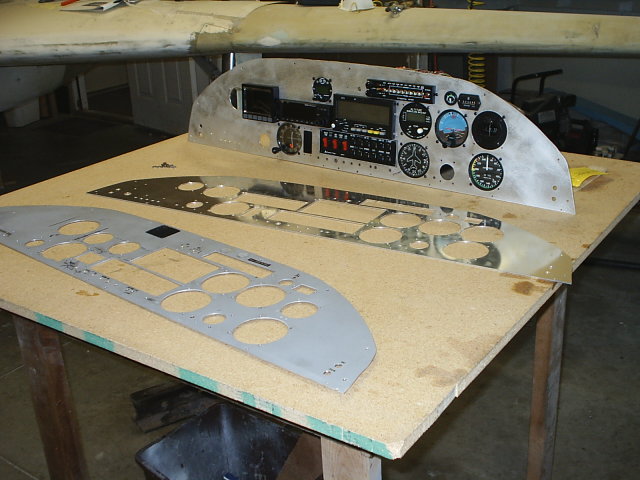
 The instrument panel is taking shape made up of some digital and standard gauges.
Still to come are an attitude gyro, EFIS display and possibly a UPS Tech GPS/Comm.
Due to state taxes (about $3K) that I will need to pay after construction, the EFIS
and UPS GPS/Com may have to be delayed. My plan is to use the standard gauges (RHS)
as backup and install EFIS display later on pilots side.
The instrument panel is taking shape made up of some digital and standard gauges.
Still to come are an attitude gyro, EFIS display and possibly a UPS Tech GPS/Comm.
Due to state taxes (about $3K) that I will need to pay after construction, the EFIS
and UPS GPS/Com may have to be delayed. My plan is to use the standard gauges (RHS)
as backup and install EFIS display later on pilots side.
Fuselage door post reinforcement:
Upper left shows the door/window post reinforcement required by
factory instructions. The instructions specified 1/4" by 1" wide aircraft
plywood contoured to the fuselage and then covered with four layers of
glass. But I found that getting in/out of the fuselage is somewhat
awkward with nothing to hold on to. So I made the window post
reinforcements (front and back) dual purpose - shaping them into
handles. The are made out of two pieces of 3/4" aluminum tubing and a
center 3/8" solid aluminum rod and after welding them together glassed
that in place with 2 layers of S glass. It actually turned out to be
easier in terms of contouring than shaping the plywood.
With the availability of high intensity LED's I plan to use them for cockpit interior lighting.
s
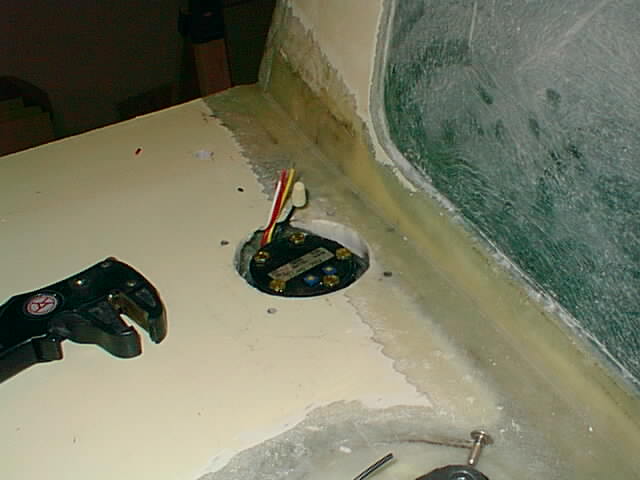
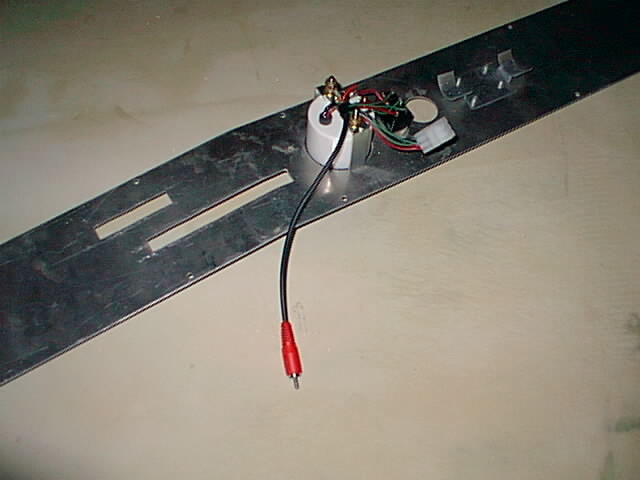
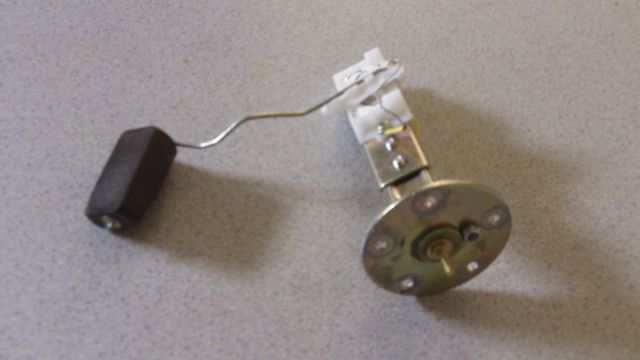 2012/05/05 Postbuild note: In 2010 I changed the Franklin 10.5
pistons to 8.5 to allow burning 92 mogas. The problem was the capacitive fuel
sensors were off significantly - they require fixed fuel capacitive properties.
I tried to design new optical type fuel sensors
that would fit in the same narrow space. Normal resistive mechanical sensors
require lots of room. But running out of time in 2012, I managed to cut/bend/shape
the standard resistive sensors to fit into the tank. You can see the contortions
I made and even had to shave the float foam to fit.
2012/05/05 Postbuild note: In 2010 I changed the Franklin 10.5
pistons to 8.5 to allow burning 92 mogas. The problem was the capacitive fuel
sensors were off significantly - they require fixed fuel capacitive properties.
I tried to design new optical type fuel sensors
that would fit in the same narrow space. Normal resistive mechanical sensors
require lots of room. But running out of time in 2012, I managed to cut/bend/shape
the standard resistive sensors to fit into the tank. You can see the contortions
I made and even had to shave the float foam to fit.
 Connecting the Microair transponder (LS) circuit to the digital encoding altimeter (RS). The tiny
transponder takes very little panel space.
Connecting the Microair transponder (LS) circuit to the digital encoding altimeter (RS). The tiny
transponder takes very little panel space.07/05/05 PostBuild Usage Note: The Microair is the lightest (1.4 lbs) and smallest world transponder. The negative side is that there is no US servicing centers and has to be sent back to Australia for servicing. I had a initial model which had problems with internal software version. Even for that I had to send it to MicroAir Australia taking about three weeks with fastest shipping available - customs, etc. They did the upgrade for no charge.
 The Taskem 2000 digital altimeter with encoder is a well featured device. But the simple
wobbly card edge connector on back is not likely to withstand long term vibrations.
To secure it, I added two 8/32 screws going through two aluminum bushings and two wing nuts
riveted from inside the housing.
The Taskem 2000 digital altimeter with encoder is a well featured device. But the simple
wobbly card edge connector on back is not likely to withstand long term vibrations.
To secure it, I added two 8/32 screws going through two aluminum bushings and two wing nuts
riveted from inside the housing. The RST-564 audio panel (kit) has "pigtail" connector assemblies dangling on the back.
Didn't like the idea of wires dangling from connectors going to different instruments.
I rewired it using Radio Shack connector strips. The strips are fastened to the top
of the panel casing with small sheet metal screws. It makes it far easier to connect
wires from other instruments and a neater look.
The RST-564 audio panel (kit) has "pigtail" connector assemblies dangling on the back.
Didn't like the idea of wires dangling from connectors going to different instruments.
I rewired it using Radio Shack connector strips. The strips are fastened to the top
of the panel casing with small sheet metal screws. It makes it far easier to connect
wires from other instruments and a neater look.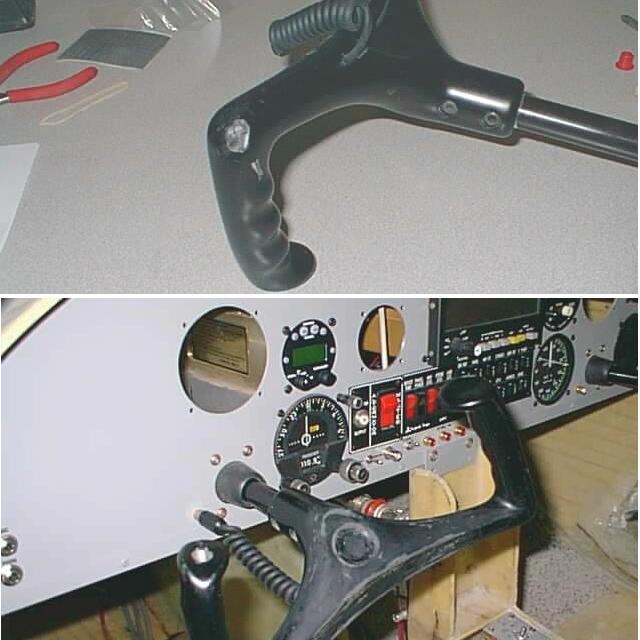 A series of 3/16 holes drilled through yoke accommodates pushbutton mic switch routed
to a coiled cellular charging cord connected to the instrument panel with a simple audio
connector. This allows easy removal if maintenance is needed rather than some
permanent routing through a panel grommet hole.
A series of 3/16 holes drilled through yoke accommodates pushbutton mic switch routed
to a coiled cellular charging cord connected to the instrument panel with a simple audio
connector. This allows easy removal if maintenance is needed rather than some
permanent routing through a panel grommet hole.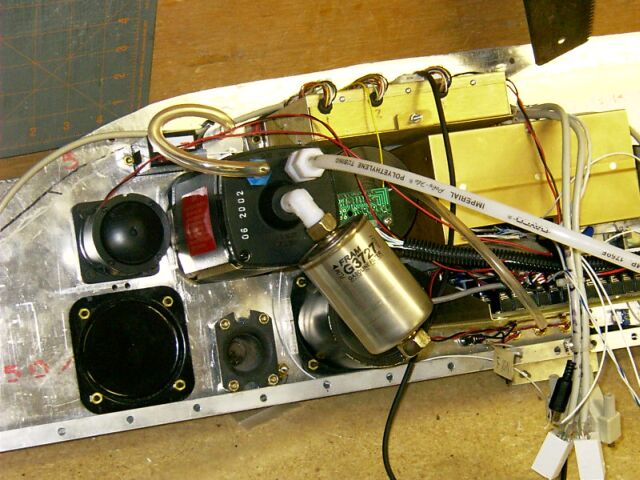 Vacuum gyro filter:
Found this larger fuel filter at Wal-Mart - Fram G3727, $9.95. Anybody know why it could
not serve as a vacuum gyro intake air filter? It has a screw connection that just fits
on a 1/4 npt x 3/8 plastic fitting. It has very low air flow resistance.
Vacuum gyro filter:
Found this larger fuel filter at Wal-Mart - Fram G3727, $9.95. Anybody know why it could
not serve as a vacuum gyro intake air filter? It has a screw connection that just fits
on a 1/4 npt x 3/8 plastic fitting. It has very low air flow resistance.Just heard from Dynon Development 03/06/03. Finally their EFIS D10 should be ready to ship in about 10 days. $2K for 10 avionics functions is an excelent value. That will complete the IFR level avionics I wanted for now. Some day hope to add an IFR approach GPS/COM and autopilot.
03/27/03: After testing with engine running, found the Fram G3727 air filter works very well - hardly any air resistance. Why would anyone pay typical $40 for a "vacuum" filter?
 The instrument panel is all there and functioning with all controls/engine sensors connected (except OAT
and carb temp sensor defective).
The instrument panel is all there and functioning with all controls/engine sensors connected (except OAT
and carb temp sensor defective).
The new Dynon EFIS-D10 can be seen on the pilots side - a compact flight system that replaces 10 flight
instruments, with a neat intuitive LED screen, push button setup well worth the
$2K price. It fits into a 3 1/8 standard hole with the screen/buttons occupying a 4 x 3.5 space on front of panel.
For some functions (airspeed limit colours, updating firmware, etc), the D10 requires the use of a laptop
connected to it through a RS232 port. Since it only requires TX, RX and ground connections, I used a miniature
stereo receptacle (two plus ground) installed in the control panel (arrow). A stereo plug connected to a cable
and then to a female DB9 RS232 goes into the PC. Works fine.
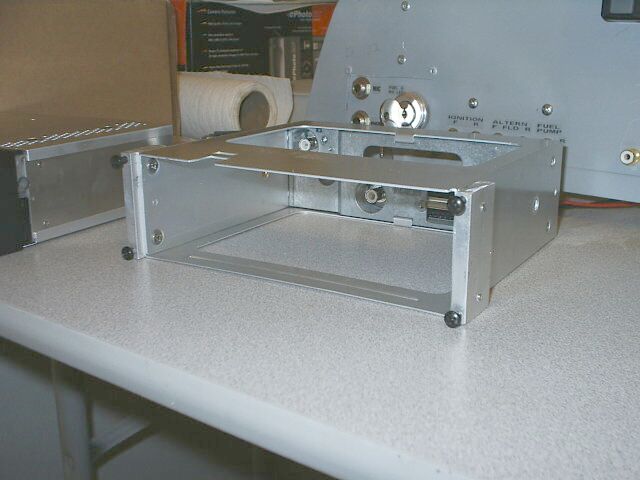
A neat way to fasten mounting trays for various instruments is with 1/4" thick aluminum bars with perpendicular threaded screw holes. The 2 mounting blocks are shown for the 300XL tray.
But if you are really tight with space, like my panel, you can have two trays
sharing the same mounting block between them.
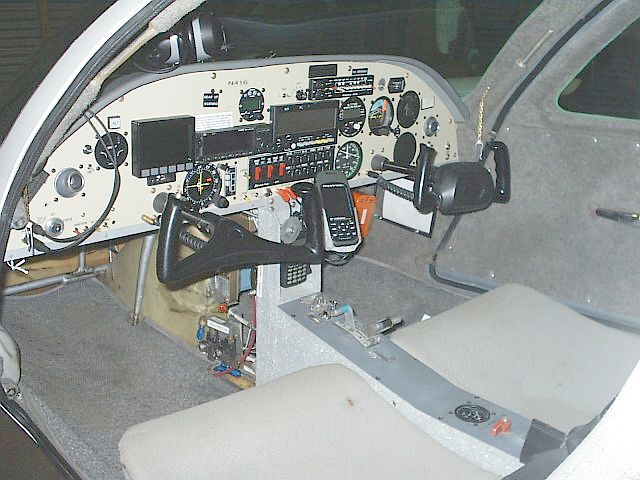
 OK. Finally the panel accommodates all my current instruments. The newer miniature
instruments sure help a smaller panel. Made a goof
with second panel having holes too close and had to re-do it.
OK. Finally the panel accommodates all my current instruments. The newer miniature
instruments sure help a smaller panel. Made a goof
with second panel having holes too close and had to re-do it.
The hole on left is for a future autopilot - DigiTrak is probably my choice now.
The square hole beside the CDI is for the AK 950 annunciator that connects
between the CDI and the IFR Garmin 300XL GPS/COM.
 And again painted and with the Garmin 300XL tested and apparently working.
The 300XL requires a CDI and Annunciator switches/lights for IFR A1 certification.
That little square thing "Annunciator" (AK-950) beside the CDI is a "measly" $715
(cheapest at Southeast Aerospace). The new Narco 122D/GPS NAV unit pushes
the price of the IFR GPS / NAV to about $6900. But it includes COM and is
a permanent installation rather than a PDA with dangling cords.
And again painted and with the Garmin 300XL tested and apparently working.
The 300XL requires a CDI and Annunciator switches/lights for IFR A1 certification.
That little square thing "Annunciator" (AK-950) beside the CDI is a "measly" $715
(cheapest at Southeast Aerospace). The new Narco 122D/GPS NAV unit pushes
the price of the IFR GPS / NAV to about $6900. But it includes COM and is
a permanent installation rather than a PDA with dangling cords. There are umpteen connections behind the panel and really crowed. I placed the
Garmin 300-XL GPS antenna under the "hood" in front
compartment. Even with the garage overhead it gets an EPE of 15ft. So
composite materials over the antenna do not appear to make a difference.
There are umpteen connections behind the panel and really crowed. I placed the
Garmin 300-XL GPS antenna under the "hood" in front
compartment. Even with the garage overhead it gets an EPE of 15ft. So
composite materials over the antenna do not appear to make a difference. I got the DigiTrak from Van's aircraft (ordered 08/02/03 and received 08/13/03 - 11 days total). They had the best price I found on the net - $50 below standard retail. And they did not gouge on shipping. For some reason they even refunded the $4 handling charge - so shipping was free. The DigiTrak panel unit is really tiny - 2.25 x 2.25 x 4 deep. It is supposed to track a GPS course - real handy for IFR. The Trutrak LED display is really too bright even for daytime. I tried to design a simple photoresistor/transistor dimming circuit. But it turned out that the pin for the dimming circuit required about 180ma - too much current for any simple transistor circuit. I ended up using 1/2 watt 150ohm / 300ohm resistors with a "dim" switch which toggles from one to the other.
06/06/05 postbuild note: The flight tests showed very good Digitrak performance so I decided to add the Alltrak altitude hold unit since the SQ2000 (and assumedly other canards) is pitch sensitive. The AllTrak unit seems to hold the altitude well in calm air and mild turbulence. But in medium and severe turbulence it does more hunting and overcorrection.
With today's smaller digital avionics I managed to cram in an IFR panel with redundancy (and yokes) on a panel one inch shorter height than factory size.
 The center console
sides have been painted with Zolatone paint for an effective yet inexpensive
result. I still have most of the gallon left.
The center console
sides have been painted with Zolatone paint for an effective yet inexpensive
result. I still have most of the gallon left.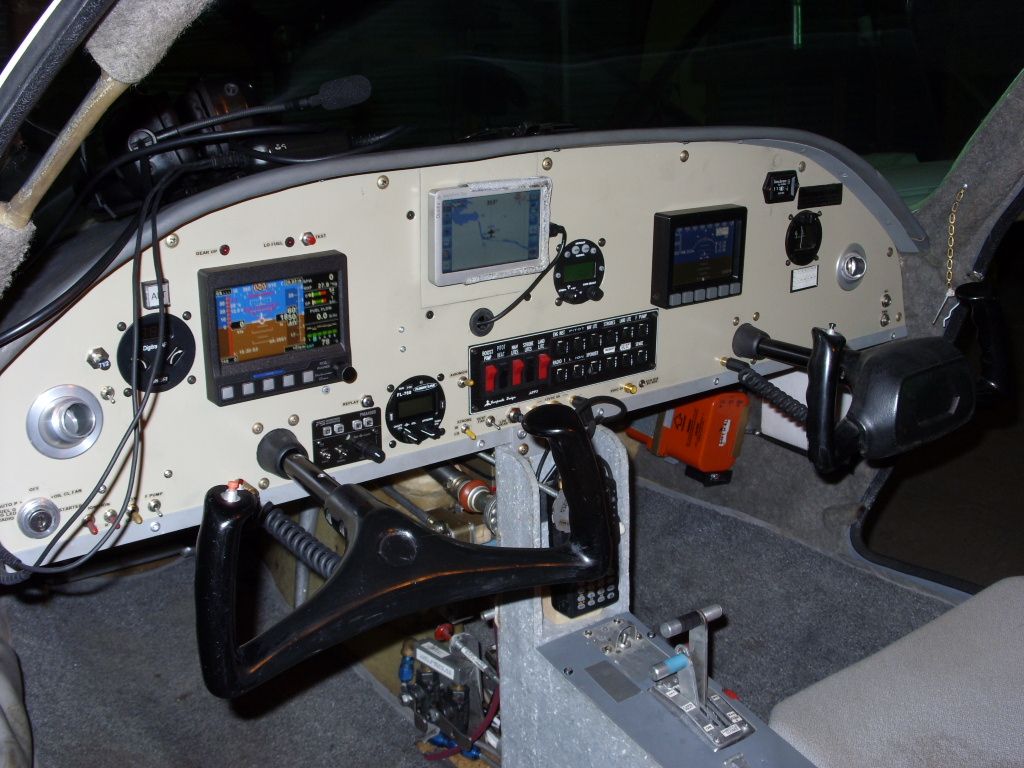
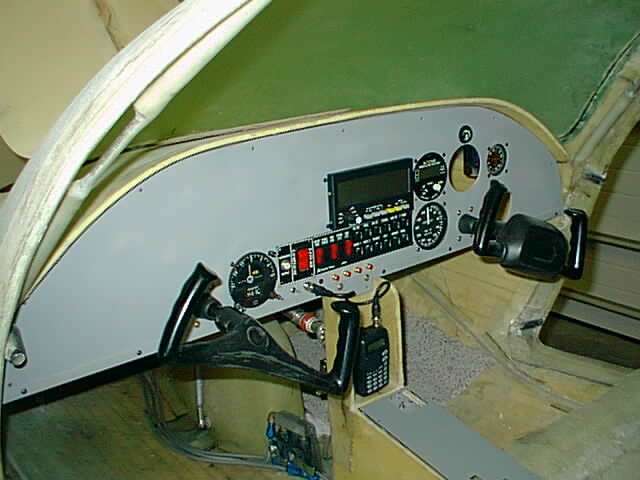
 09/13/2010 Panel Revision:
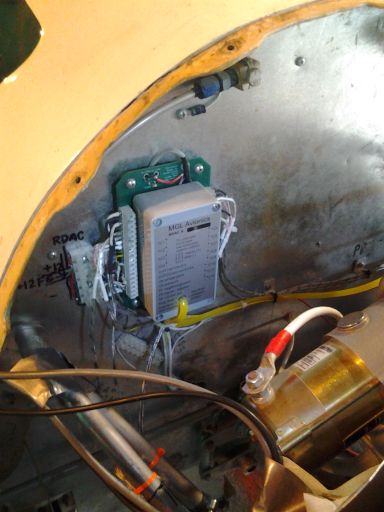
You can see the newer less cluttered panel. I sold the Garmin 300XL/King 950/NARCO 122D/GPS IFR package since I never got an IFR rating as I planned. The new additions are MGL Mini EFIS/EMS ($1330), Flightline FL-760 radio and Anywhere Map Quadra GPS. I also sold the redundant steam gauge avionics and moved my Dynon D10 to the right as a backup. The MGL has a GPS flight attitude simulator which seems good enough for VFR flying. This eliminates the need for purchasing the expensive AHRS addon. The Dynon D10 backup EFIS has an AHRS built in. The MGL replaces the RMI engine monitor too and saves me a ton of wiring. There is probably 10 lbs less weight in the new installation and more free panel space.
The second photo shows the MGL "RDAC" unit in the engine compartment from which only one 3 lead cable goes to the MGL EFIS/EMS and engine sensors connect to it in the engine compartment. Unlike some competition, MGL engine monitor adapted to most of engine sensors I already had and saved me a ton.